Posts

Showing posts with the label Making

Making Dream Catchers

Image
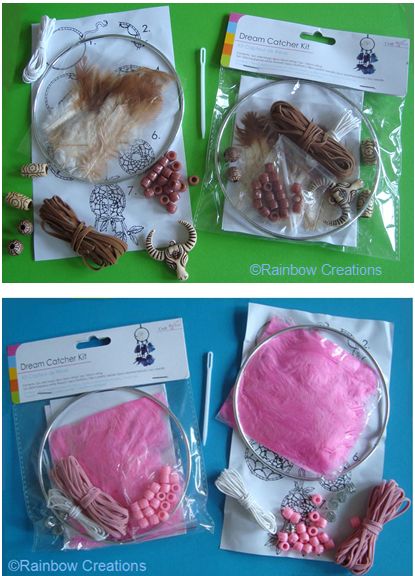
Never having had ever made a dream catcher before, this craft was a skill unknown to us. We wanted to make a dream catcher from a kit as we needed to know how to make it with instructions there in front of us. Dreamcatcher Kits are available in two colours, one to make a pink dream catcher and one to make a brown dream catcher. It is one of those things that having made one for the first time, the second time of making it is much, much easier! We came across a couple of small difficulties, however, through trial and error, we resolved these which gave a great sense of satisfaction. The kits come with a metal hoop and leather thonging to create the base that the feathers hang from. We worked it out that the best way to stop the thonging unwinding was to use a paper clip to hold it firm whilst the remaining thread is wrapped round the hoop. We also discovered that the stitches need to be a tight as possible in order to create the tension required without the stitches looping....

A Handmade Mother's Day Gift For Children To Make

Image
With Mother's Day not too far away, we realise that many people will be thinking ahead as to what children can give to Mum for Mother's Day this year. We think that handmade gifts are so much more meaningful than an off the shelf purchase, so what better than for children to make something to give. Today we have been making bracelets for Mum using beads which are suitable for any age of child to use, even preschoolers. To personalise the bracelets we used children's alphabet letter beads . We have both smaller letter beads and larger ones for the little children to use. We sell the beads by the letter so that the choice of letter is guaranteed. Also in mixed letter packs . For an individual child, a mixed pack would be fine, but for groups who would require several of the same letter (in this case letters M U and M) the additional packs of single letters are advisable so as not to be disappointed that there are not enough of the letters you need. Bracelets made for...

Homemade Flags for Sandcastles

Image
Have you ever thought to make your own sandcastle flags? They are usually just a round thin wooden stick with a rectangle or triangle of paper attached to the top. Building sandcastles is a typical childhood summertime activity and flags are often a last minute thought, even when just arriving at the beach. When the sun goes in behind a cloud, (well in a British summer, that happens), what better thing for young children to do than build a sandcastle.  Did you make sandcastles as a child? British Beach in Summer And, isn't waiting for a summer holiday is a difficult thing for children to do!  Here we are preparing with a physical activity where their thoughts are, and can still be, focused on what they want to think about - their summer holiday or trip to the beach. When children use their hands doing a craft activity, it keeps them busy, making it easier to control any excitement and keeps them calmer too. Flags can be made as simple or elaborate as you like - ...

Nature Inspired Jewellery Making Craft for Children

Image
Although this blog post may seem very much like a children's craft tutorial on how to make a bracelet, the purpose behind it is for children to so see that nature can be used creatively as inspiration for their jewellery making and arts and crafts generally. Autumn Leaves for Inspiration Here we made a bracelet that children can make themselves using the same pack of beads as previously used to make the blackberry inspired bracelets here. This time we chose brightly coloured beads which were the same colours as the autumn leaves. We threaded them to make a stretchy bracelet in this manner. DIY bracelet for children to make When learning to create, skills are needed which can be built upon, little by little, in the future. So here is the craft tutorial too! To make this style bracelet you will need a good length of round elastic (approx 1 meter) For children to make a bracelet like this, the holes in the beads must be large enough for the elastic to fit through ...

Children's Button Bracelet Craft

Image
This is an easy version of making a button bracelet which is suitable for young children to make. Here we are threading the buttons on to the elastic or thread in a straight line.   Instructions Cut a length of cord (or round elastic ) approx 50cm long and fold in half. Taking each end, thread through the first button, leaving a loop. This loop is for fastening the bracelet on to the wrist. Thread on the remaining buttons in a line using both ends of the thread. Tip - buttons with four holes are easier to use, rather than two holed buttons. This is because both of the threads would need to pass through the single hole on a two holed button. This really is a squeeze and children would find it difficult to do. Thread on the buttons Keep adding buttons until the length will fit round the wrist. We overlapped the buttons slightly so that when curved round the wrist there are no spaces. You might like to do it like that or not. There is no right or wrong way ...

A Mini Christmas Tree from Cardboard

Image
We made a Christmas tree from cardboard. This one happens to be a mini Christmas tree but it can be made on whatever scale you like. A Christmas tree from cardboard can be made by children of any age. Here we have used a ruler to measure out the tree shape to make it symmetrical, but a younger child might like to draw free hand. After making a template from paper, we cut out the tree from cardboard. To make the inner tree shape we used kitchen foil. We decorated with white snowflake sequins and made a base from a strip of cardboard, formed into a triangle. The lovely thing about working with cardboard is that it is strong and ridged but also can be manipulated. To go one step further:  Use hook and loop dots instead of snowflake sequins. Attach embellishments such as coloured pom poms , pony beads or buttons to the other half of the dots - great fun for a preschool child to decorate the cardboard tree ...over and over again

Making Peg Doll Angels

Image
Increasing our Christmas range of children's' craft products we have introduced our peg doll angel kits. These kits make a Christmas angel which can be hung on the Christmas tree or in a child's bedroom. The whole pack is ideal for a group, such as Brownies, after school clubs or by teachers for their classes. To make: First make the face by placing the adhesive face sticker on the round end of the peg. Fold the silver doiley in half and half again.Cut a small part off the triangle- enough to enable the peg to slip through.  To make the dress - push the dolly peg through the hole and glue into place. Allow to dry. Cut approx 10cm tinsel string and wrap round the top of the dress. Use a dab of glue to secure. To make the hair - wrap the gold thread around a piece of card, roughly the length of the you require for the angels' hair. Using another small piece of cord secure all threads together by tying a knot. Then tie the two ends together - this fo...

Making a Children's Craft Box

Image
The best type of box to hold children's craft supplies is a container that is inexpensive. The reason is, that as you collect craft materials for your child to use, you will find that the need for a bigger box comes quite quickly. A large shoe box with a lid, covered with either wrapping paper or plain paper, such as brown paper or coloured paper, is a good size box to start off with. Your child could decorate or personalise their box, once covered.  As you progress to a larger box, you could add handles, to carry with, made from thick cord - the type found on gift bags is suitable. Contents When filling a craft box for children, the best thing is to offer a range of craft supplies which can be used in different ways. What to put in a children's craft box Basic equipment you will need Paper scissors, glue spreaders and glue Materials to work with The following craft supplies will provide your child with materials to work with. T...

Model Making with Mod Roc

Image
Have you ever used Mod roc ?  Mod roc is the name given to bandage covered in plaster of paris. It is used to make large structures and models with the advantage of being light in weight and easy to use. Once dry, the model will be strong. Mod roc is a superb art material for building scenery, making masks, puppet, castings and sculptures. Children can use Mod roc under adult supervision. This Mod roc hedgehog was constructed with scrunched up newspaper, Mod roc and cocktail sticks by Elliot, Year 10. To make a Mod roc model   It is necessary to decide what you will construct the model's support from. A structure can be formed from cardboard, wire, scrunched up newspaper, cotton wool, foam, card board tubes, pipe cleaners or even a blown up balloon. Use plenty of tape to create the basic shape. Once the structure is made Mod roc is draped over the structure. This will level and make your structure continuous. It will smooth out and manipulate the shape ...

Daffodils and Leeks for Eisteddfod

Image
We have be helping busy Mum, Clare Thomas on Google+ with craft ideas for her children's Eisteddfod in school. Clare needed to know how she could help her children make a model daffodil and leek. We discussed many ideas including: For the daffodil -  - an egg box segment for the trumpet - yellow card for the daffodil petals - green pipe cleaners, lolly sticks (either round or flat) for the stem - paper leaves either sugar paper or card For the leek- -kitchen roll covered in crepe paper, -for the bulbous leek base build up with tissue and plenty of glue -for the roots - string, wool, thin fabric strips After much thought and input from her children, Clare decided to make the daffodil and leek from paper mache and lots of paint to the delight of her little daughter. Don't they look just great? They had worked together to decide what would be the best materials to use and how to use them. Their art work is their own and her two children have ...