Some simple embroidery stitches that children can learn to do themselves, many of which are variations of one type of simple stitch.
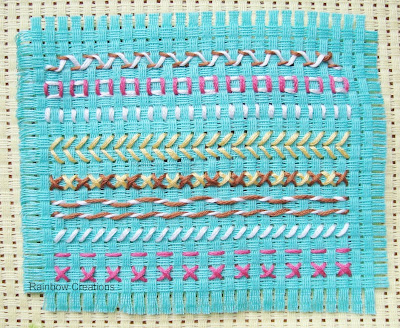 |
| Embroidery Stitches for Children |
The stitches here are purely based on a running stitch (up one hole, down the next) or a cross stitch (up one then diagonally down one). Depending on the direction, or the angle of the needle, variations can be sewn.
Teaching children to thread a needle if your child is right handed, (reverse for left handed), bring one end of the thread round until it meets the other thread, forming a loop and hold in your left hand. Hold tightly between your thumb and finger, insert the needle into the little loop, eye first, and pull tightly away from the thread to make the loop firmer. Push the end of the loop through the eye of the needle.
 |
| Threading the needle |
To begin sewing, turn to the back of the fabric and thread the needle though the raised weave of the canvas for 2 or 3 stitches. Push the needle through to the right side of the canvas in the hole where the stitching is to start. If your child has a tendency to pull hard on the thread when sewing this will undo the thread from the back and the sewing stitches will come out. To stop this from happening, sew a stitch over itself on the reverse of the fabric before starting stitching on the front.
 |
| How to start off sewing embroidery stitches |
To do the whipped stitch (white and brown thread in the image), a contrasting thread is whipped over the running stitch. This can be known as snake stitch as the appearance resembles a snake. It's created by working a row of running stitch, then weaving in and out of the surface thread with a second colour thread. You will notice that two of the rows look very similar. However, if you look closely you will see a consistent but different direction of the woven thread.
Tip: to weave in and out of a running stitch, use the blunt eye end of the sewing needle. This is generally slightly larger and is less likely to catch the thread already sewn accidentally, which would separate the thread strands.
Tip: to ensure the stitches on the cross stitch look even, work the thread in the same direction for each stitch
Once children have gained confidence they can try some slightly more adventurous stitching.
 |
| Advanced Stitches for Children |
Chain stitch, fly stitch and feather stitch.
 |
| Chain Stitch |
 |
| Fly Stitch |
 |
| Feather Stitch |
Forming embroidery stitches involves counting. It also involves anticipating where the stitch will finish before starting the row. Creating patterns can give hours of pleasure as each piece of work can be different.
Once these basic stitches have been mastered, confidence built and a willingness to experiment, the opportunities are endless.
 |
| Children's sewing on binca canvas |
In these examples of easy embroidery stitches for children (and beginners) we have used
binca because the stitches can be created uniformly due to regularity of the holes in the canvas. This helps in the understanding of spacing the stitches for when the child sews on fabric without holes.


Comments
Post a Comment
Questions, comments or ideas always welcome